Get Started with Test Junkie
This project is in alpha, if you want it to succeed, consider giving it a star on GitHub!
installation
In order to install Test Junkie you need to have Python installed. Test Junkie supports Python 2.7+ and 3.5+
- From your terminal, install using pip:
pip install test-junkieorpython -m pip install test-junkie - You are done and ready to go!
To upgrade to latest version: pip install test-junkie --upgrade
To uninstall: pip uninstall test-junkie
- Clone Test Junkie repository from GitHub:
git clone https://github.com/ArturSpirin/test_junkie.git - Go to the Test Junkie root directory:
cd test_junkie - Install using setuptools:
python setup.py install - You are done and ready to go!
test definition
Lets get you started with some initial test definitions.
Save code bellow into a local Python file. Lets say
C:\Development\MyTests\demo.py.
from test_junkie.decorators import Suite, beforeTest, afterTest, test, beforeClass, afterClass

@Suite()
class ExampleTestSuite:

    @beforeClass()
    def before_class(self):
        print("Hi, I'm optional before class")

    @beforeTest()
    def before_test(self):
        print("Hi, I'm optional before test")

    @afterTest()
    def after_test(self):
        print("Hi, I'm optional after test")

    @afterClass()
    def after_class(self):
        print("Hi, I'm optional after class")

    @test()
    def something_to_test1(self):
        print("Hi, I'm test #1")

    @test()
    def something_to_test2(self):
        print("Hi, I'm test #2")

    @test()
    def something_to_test3(self):
        print("Hi, I'm test #3")
from test_junkie.decorators import Suite, beforeTest, afterTest, test, beforeClass, afterClass

@Suite(parameters=[{"example": 1}, {"example": 2}])
class ExampleTestSuite:

    @beforeClass()
    def before_class(self, suite_parameter):
        print("Hi, I'm optional before class and I'm parameterized with: {}".format(suite_parameter))

    @beforeTest()
    def before_test(self):
        print("Hi, I'm optional before test and I'm not parameterized! "
              "However if you add \"suite_parameter\" to the method signature, I will be!")

    @afterTest()
    def after_test(self):
        print("Hi, I'm optional after test and I'm not parameterized! "
              "However if you add \"suite_parameter\" to the method signature, I will be!")

    @afterClass()
    def after_class(self, suite_parameter):
        print("Hi, I'm optional after class and I'm parameterized with: {}".format(suite_parameter))

    @test(parameters=[{"example": [1, 2, 3]},
                      {"example": [4, 5, 6]}])
    def something_to_test1(self, suite_parameter, parameter):
        print("Hi, I'm test #1 & my suite parameter: {} and test parameter: {}".format(suite_parameter, parameter))

    @test(parameters=[{"example": [1, 2, 3]},
                      {"example": [4, 5, 6]}])
    def something_to_test2(self, parameter):
        print("Hi, I'm test #2 & I only run with test parameters: {}".format(parameter))

    @test()
    def something_to_test3(self):
        print("Hi, I'm test #3 & I'm not parametrized!")
test execution
There are two possible ways to run tests on Test Junkie. Both are fully configurable!
- Programmatically - allows to invoke the tests anywhere in your code
- Test Junkie CLI - allows to run tests without any additional code required
if "__main__" == __name__:
    from test_junkie.runner import Runner
    runner = Runner([ExampleTestSuite])
    runner.run()
runner will give you access to
test metrics that otherwise are not accessible.
See JSON report for more info on that.
There are more advanced examples in the
Running Tests documentation section.
Make sure your project is part of the PYTHONPATH
in order for CLI to work best.
Test Junkie CLI is installed by default. You can access it via
tj command from your favourite terminal.
Tell Test Junkie where your tests are located, it can be a directory or a Python file.
> tj run -s "C:\Development\MyTests\demo.py"
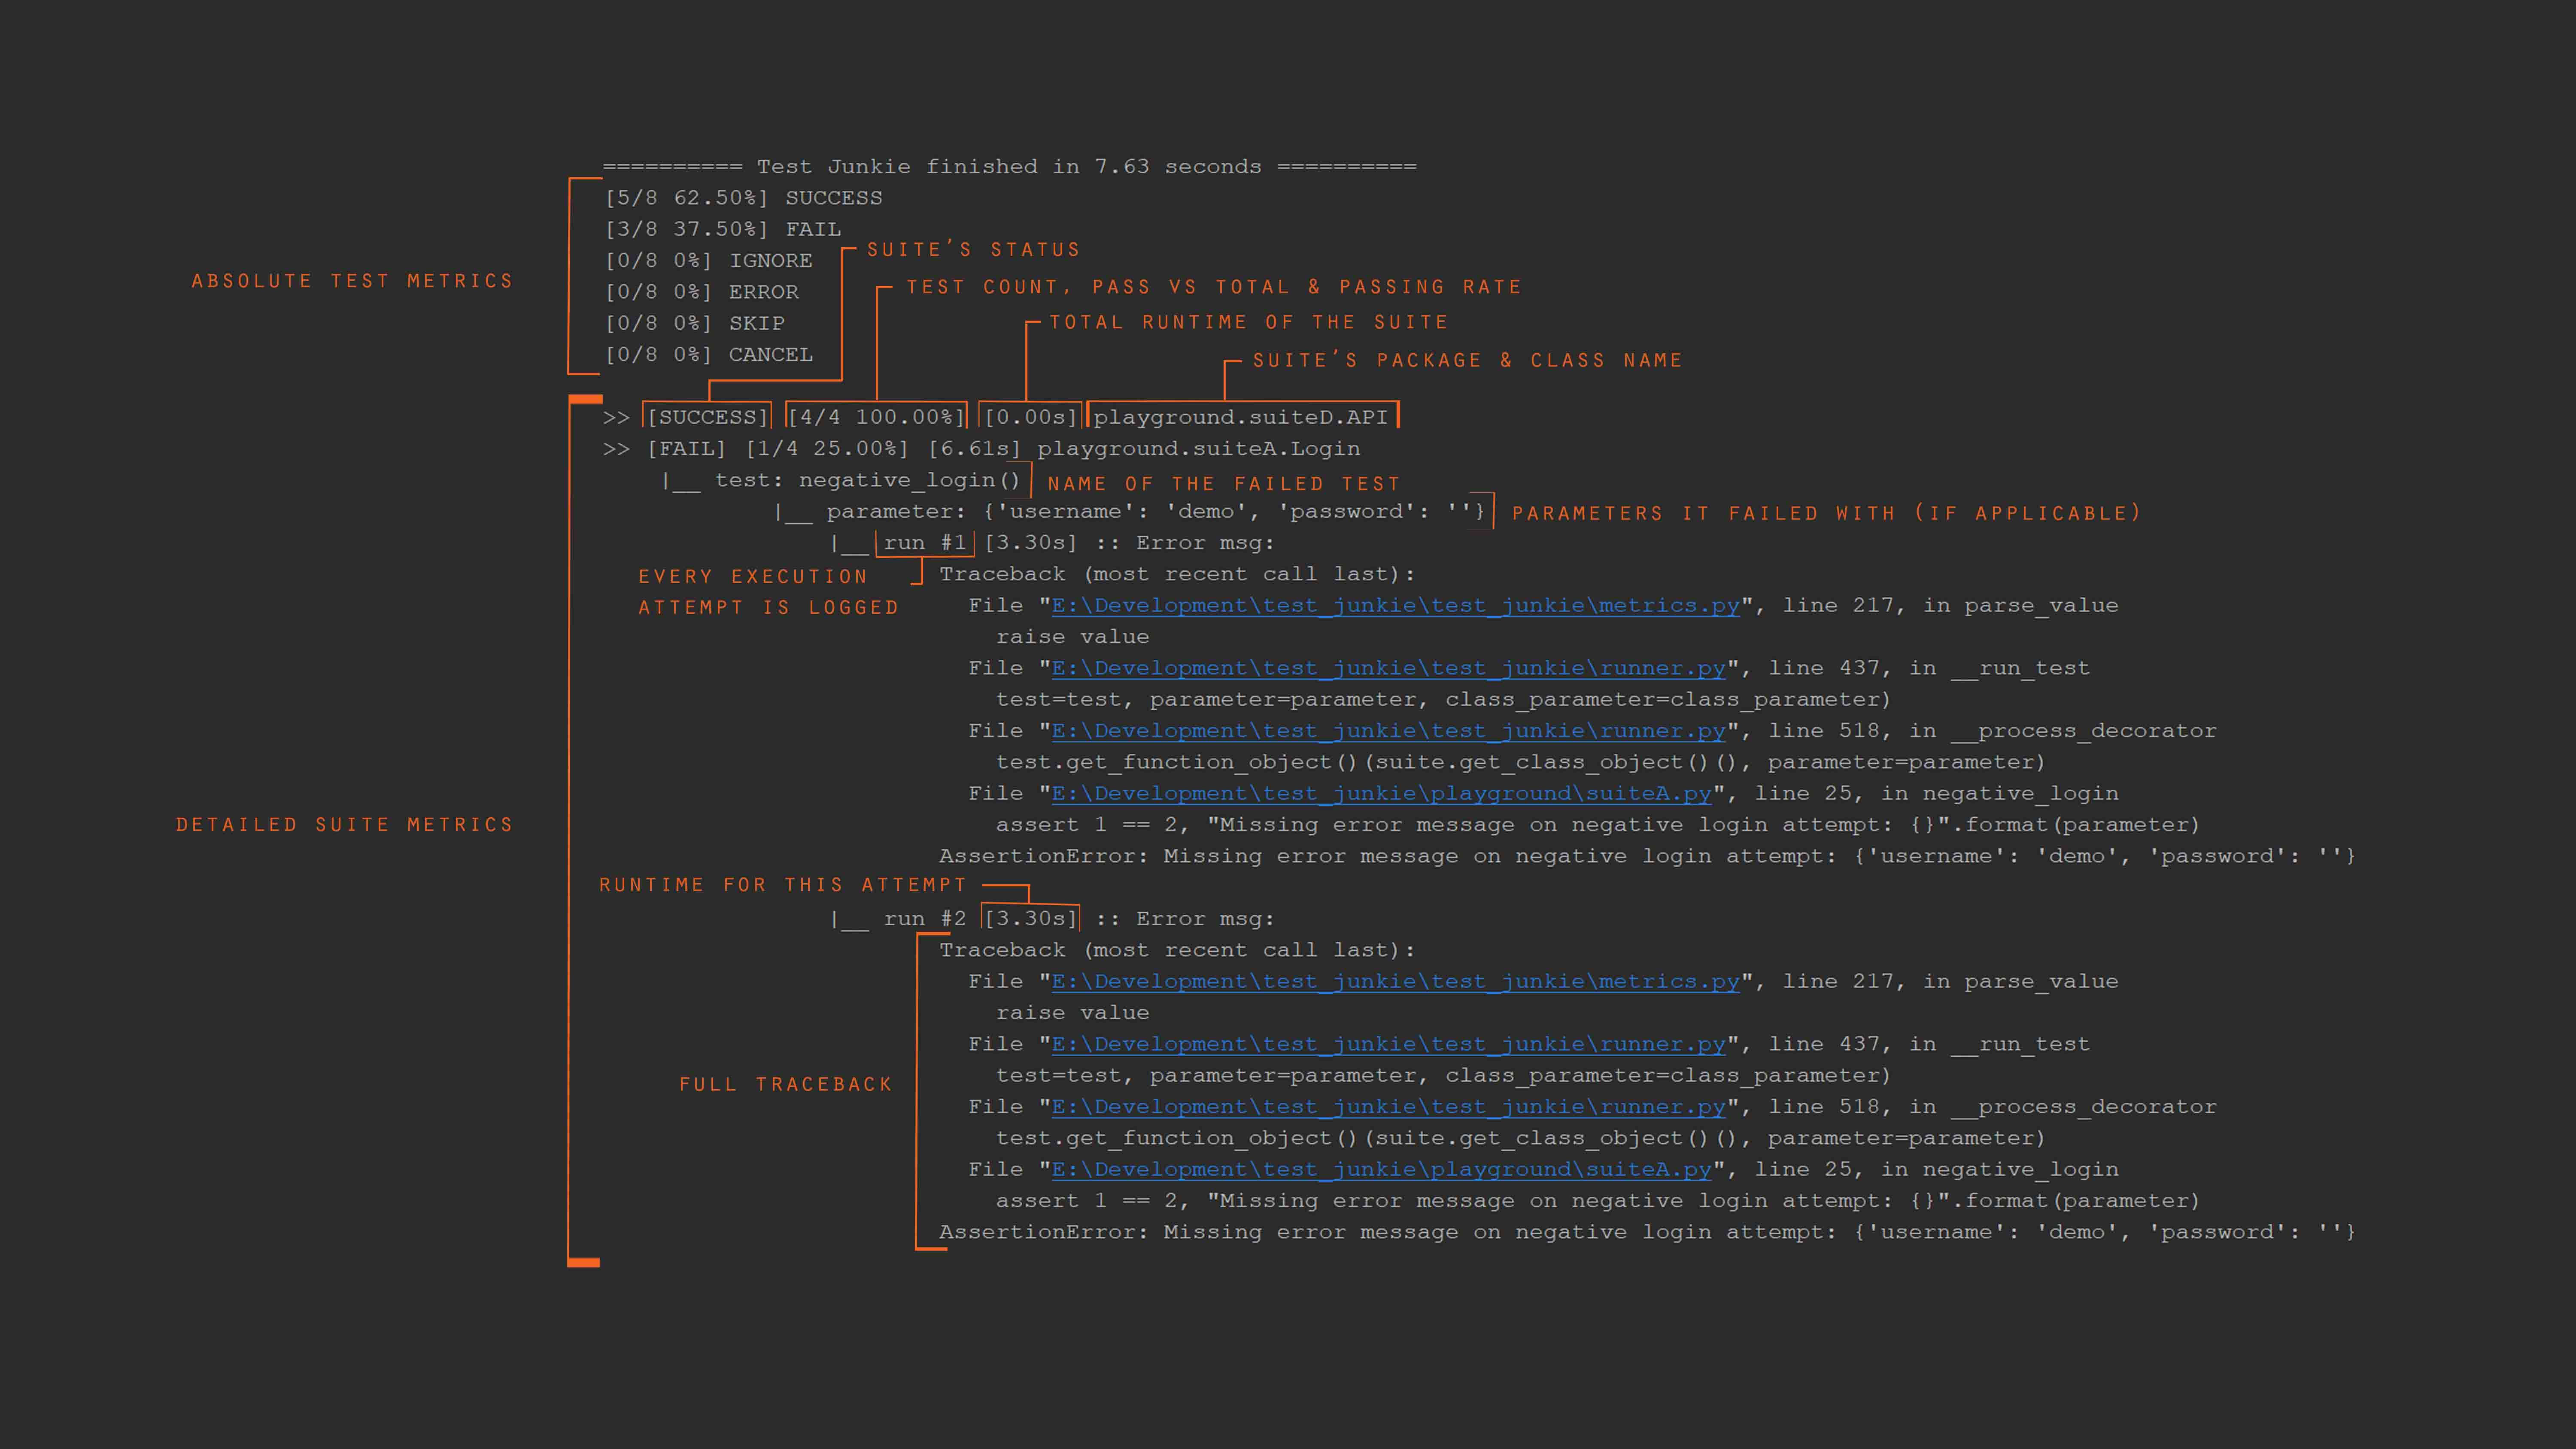
========== Test Junkie finished in 1.00 seconds ==========
[3/3 100.00%] SUCCESS
[0/3 0%] FAIL
[0/3 0%] IGNORE
[0/3 0%] ERROR
[0/3 0%] SKIP
[0/3 0%] CANCEL
>> [SUCCESS] [3/3 100.00%] [0.00s] __main__.ExampleTestSuite
============================================================
You can also save the config for later so you don't have to specify the location each time
For example:
tj config update -s "C:\Development\MyTests\demo.py"tj run
console output